Saturday, June 28, 2014

Sequencing Maschine Drum Track (and Instruments) with Ableton Push

Sequencing Maschine Drum Track (and Instruments) with Ableton Push


Mid-summer I got my hands on Ableton Push and was floored.  So. Much. Damn. Awesome. Instrument. (obligatory overused doge meme image here).  I had been using NI's Maschine for a while, which is very cool in it’s own right, but I never loved it’s built-in sequencer.  The workflow and sounds though . . . if only I could easily sequence them in Ableton Live somehow!
Ultimately, after much trial and error, I came up with a workflow that worked.  I documented it on the Live forums, and then blend.io (great service, I’ve been slacking!) picked up on it and I guest blogged there about it.
Anyway, fast forward several months and Native Instruments released v2 of Maschine’s software. Great update, but in doing so, they broke a few workflow things, which sent me back to the drawing board.  Annoyingly I had to wait for a few sub-updates first, but now it’s all back in action.
So, here’s the update to how to set it up with v2:
In Live:
  • Create a Midi track and name it Maschine A.
  • Put  an instance of Maschine on the Maschine A track, right click on the instrument and select Group to Drum Rack in the menu.
    image
  • Set Maschine receive in drum rack to All (click on the I-O button on the bottom left of the Drum Rack to expand to see this menu).

         
    image

In Maschine:
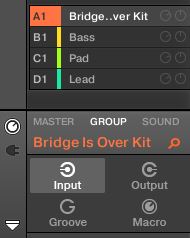
  • Click the group A1, then click Group, then click Input.  It should look like the below (specific items highlighted in white).
    maschine2-1
  • In the MIDI section, turn “Active” on and set the Channel to 1 ( as seen below).

    maschine2-2
You can now trigger and sequence that group using the Ableton Drum Rack and Ableton’s clips!
If you want to have multiple groups triggered independently each from their own Ableton Drum Racks on dedicated tracks, this is also possible using these additional steps:
In Live:
  • Create 7 additional Midi tracks and name them Maschine B, Maschine C, Maschine D, etc;, The letter is to reference the Maschine group.
  • Select all 8 tracks and group them (Command-G). Name the group Maschine.
  • Add an Ext Instrument to B, C, D, Etc.
  • Set each Ext Instrument MIDI To: Maschine A and then the associated Maschine output – for example doing this for Maschine B, the 2nd dropdown in the external instrument should read 2 – Maschine. Do the same for C (would be MIDI to: Maschine A and 3 – Maschine), and D, and how many other Maschine groups you plan on using.
  • Set the Audio From in the external instrument to the corresponding Maschine external output. For simplicity this should be the same number as the midi channel for that group: Maschine B’s external instrument will read Audio From – Out 2/-Maschine. Therefore Maschine B will be on Midi channel 2, AND audio from Out 2/-Maschine.
    image
  • To make each Ext Instrument function as a Drum Rack (note this is with using Push’s drum rack mode in mind), right click on each Ext Instrument and select Group to Drum Rack. Follow the same steps as in Maschine A with regards to the receive in the Drum Rack (all).
    image
In Maschine:
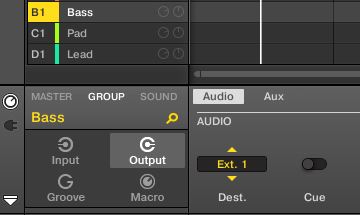
  • Starting with Group B, click the Group section in Maschine and then the Output button. Under Audio, set the Dest. to the associated channel. E.g. B would be Ext 1, C would be Ext 2, D would be Ext 3, etc.
    maschine2-3

  • If you want to use a VST/synth (e.g. Massive which now comes with Maschine for free), there’s a slight change to the MIDI routing.  Instead of making MIDI under the Group active as you did above, leave that off, and under Sound make that active.  Like so:
    maschine2-4

Now you can have potentially 8 separate Ableton drum racks, each controlling their own group in Maschine controlling everything with just the Push! 
Good luck and hopefully you’ll find this technique helpful in some way, even if it’s just a jump off point for your own setup

Saturday, June 7, 2014

PRO TIPSREVERB AND DELAY FX


Digital reverb plays two key roles in music production: giving specific sounds sonic character and helping individual parts sit better in the mix. 
Used in these ways, reverb is an incredibly powerful tool, and using reverb to create depth in a mix is a skill in itself. But reverb can also be used as a creative effect, bringing life and interest to a mix.
The tools at our disposal for the walkthroughs below will be delay plugins (even a simple mono delay will work, but one with a few filtering and modulation options makes things more interesting) and reverbs (the algorithmic rather than impulse response variety tends to be more flexible, but start with one you are familiar with). 
The other essential tool for many of the examples is the DAW’s in-built parameter automation, so if you aren’t already familiar with this side of music production then now’s the time to dive in. 
The examples below were created using Cubase but the techniques are applicable to nearly every DAW out there.

Automated reverb build

One of the simplest and most effective reverb effects is the now near-ubiquitous reverb build. The effect is easily achieved using a quality reverb plugin and your DAW’s native automation capabilities. 
To achieve the effect start by opening a new reverb on a group / bus track. The reverb needs to have a a long (slowly decaying) tail; try chamber or hall settings or even long plates. Adjust the low frequency decay to remove the lows (if available) to minimise muddiness.  If this isn’t possible then insert a high-pass filter before (or even after) the reverb. The TC Classic Reverb, below, offers beautifully smooth tails.
The very smooth Powercore Classicverb tweaked for maximum length
When you’ve got a verb setting that you like, start adding reverb using the synth track’s FX ‘send’ control. Using a track’s send allows you to control how much of the synth audio is sent to the reverb processor.
The final step, and the one which creates the ever building reverb wall, is to draw in an automation curve – or diagonal line – on the synth track from 0 to maximum (or near maximum) send. Once this is in place ensure that the automation plays-back OK (it will usually need to be write or read-enabled). 
The result is a synth part that gets ever more swamped in reverb. When the synth part drops out the reverb creates an ambient halo as the tail fades away.
This effect works best on mid and higher frequency sounds as they do not clutter the mix as much as reverb-drenched bass elements, but it’s worth experimenting with anything from vocals to percussive elements, pads to synth toplines.

Percussive reverb hits

A second trick, which has gained popularity among minimal and tech-house producers, is to use subtle and occasionally not-so-subtle reverb splashes to pick out selected drum and percussive hits to add interest and variation to a groove.
The trick works by using automation in a similar way to above, but only on select single hits. The classic example is on the first kick drum of a breakdown.
A more subtle refinement of this technique is to use it on snare or clap hits on the last downbeat of a bar. Mid-length reverb treatments work better here. 
The same technique is equally useful during rolling grooves to introduce subtle shades of sonic colour: just pick out individual hits, feed them to the send and then let the verb tail roll into the groove. Try sidechaning the tail to make it breathe in time with the wider rhythm.
You may find that automating the reverb send on/off status (rather than the level) makes things a little when handling short hits. 

Vocal Delay and Reverb Spin FX

Spot FX work as well using delays as reverb. If you’re looking to make different sections of a track flow together then delay spot FX are a useful tool to throw into the mix. 
Vocal sections can be neatly rounded-off with an automated feedback delay effect. Add a delay plugin to a bus as in the reverb example above. 1/8th or 1/4 note delays work well, as do triplet settings. The feedback should be pushed up to give a noticeable series of repeats.  If there is a filter section in the feedback chain then roll away the low (and high) frequencies to avoid audio clutter.
Here’s the vocal delay spin effect in action:
There’s nothing stopping you from automating the feedback tail as well:
Anything in the tail can be automated, from repeat amounts, to delay time (try changing this for some seriously messy builds) to low and high-pass frequency values. Here’s what the above vocal delay automation looks like in Cubase:

Reverse reverb

Another classic reverb effect – perhaps THE classic – is the time-honoured ‘reverse reverb’.  You know the sound, most commonly heard as a spooky reversed reverb leading into a vocal: the classic ‘Poltergeist’ effect.  Dating back to the days of multitrack tape, the effect is relatively easy to achieve. Here’s how you get it:
1. Take the audio that you want to process.
2. Make a copy of it and move it to another track.
3. Reverse the copied audio.
4. Set up a reverb plugin as an insert effect across the reversed track. Set it to 100% effect.
5. Bounce/export the result to a third track.
6. Reverse this newly bounced reverbed audio.
7. Tweak the start position of the new audio file so that it ‘rises’ into the original unprocessed audio.
8. Job done.
This technique isn’t just for vocals.  It sounds great on synth parts (it’s very popular among deep house producers), drums, percussive layers – even basslines if used sparingly.
Here’s an unprocessed synth line:
Here’s the same line with the reverse reverb effect:
Here’s an even more extreme setting:
And here’s how it looks in the DAW:

Reverse delay

As with reverb spot FX, you can use delay to create interesting reversed delays.   Here’s an example using reverse delay on our original synth line:
Try experimenting with different delay times, feedback values and filter settings for a wide variety of effects:

Cause and effect

The above techniques are great for getting you out of a creative rut, especially when trying to find something to make your arrangement work more seamlessly, or add interest to any kind of hook line. 
Remember that the reverb or delay parameter settings you use will have a dramatic effect on the success (or otherwise) of all of these tips, so spend time experimenting with values before committing to them.
Have fun.

Friday, June 6, 2014

How to use transient shaping on drums


A step-by-step guide to sculpting your kick and snare

Transient designer plugins provide an efficient method of shaping the amplitude response of a signal in a way that's often more clean, simple and precise than more traditional compressor or limiter devices.
Here, we're going to shape the attack and sustain characteristics of a kick and snare in a modern drum mix.
As is the case with any dynamics processing, you should always re-adjust your final output level to match your unprocessed signal's loudness, as it's easy for gain increases to fool you into thinking a particular plugin is making things sound better. You'll notice that we've used our plugins' gain controls to do just this.

Step 1: Here we've got a 121bpm house beat consisting of a 4/4 kick drum, percussion loop, and snare on beats 2 and 4. It's clear this drum mix can be improved - our kick is dull and excessively lengthy, while the snare has an overly-prominent attack and little sustain.

Step 2: We initially mute our snare so we can focus on the dynamics of our kick drum, which is lacking front-end snap. Its boomy tail will also pose some low-end problems when we add a weighty sub bass part to our track later.

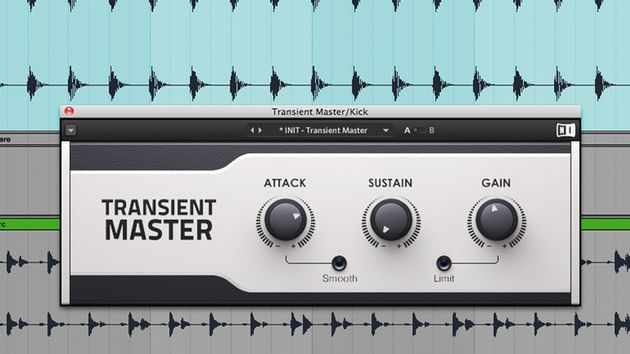
Step 3: We load NI's Transient Master across the kick and increase the attack to around 50%, pushing the front-end crack of the kick forward in the mix. Turning the sustain down to minimum also shortens its length. However, we've now pushed up some boxy mid-range frequencies.

Step 4: An EQ notch at 130Hz carves away this honky characteristic, and we're now left with a tighter, punchier kick drum that cuts through the mix whilst leaving more room between each beat for a deep and powerful bassline to be added later.

Step 5: We can now unmute our snare and compare it with the other drum elements. Its excessive snap and lack of body are even more apparent against our newly-shaped kick drum. Instead of discarding it for a new sample, we can apply some simple transient processing once more.

Step 6: A fresh Transient Master simultaneously pulls down the snare's initial peak and pushes up its sustain, bringing out the body of the hit whilst reducing its spikiness against our kick. The plugin's gain dial is turned up to re-level the sound in the mix.

What is a spectrum analyser?


We explain how this essential tool operates and what it can do for you

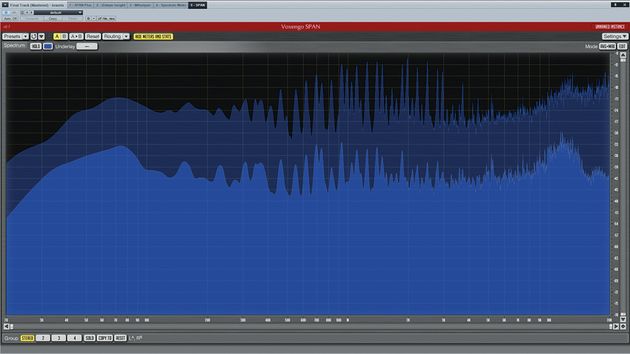
Spectrum analysers give great insight into your sounds by deconstructing the so-called frequency spectrum to show the levels of the various frequencies present in an audio signal. Displayed as a graph, the horizontal axis is frequency and the vertical position gives the amplitude of those frequencies.
Reading the graph from left to right shows you the relative levels of the bass, middle and treble parts of the sound. So, a huge 'bump' on the left-hand side of the graph means the signal has a ton of bass; a hump in the middle means the midrange is prominent; a steep downward slope on the right means the treble is dull, and so on.
Typically, spectrum analysers display frequencies from 20Hz to 20kHz = the range of human hearing - while the vertical axis is in decibels.
As well as giving feedback on individual sounds, spectral analysis is particularly useful when checking the overall balance of frequencies within a mix or the relationship between individual elements of a mix. This becomes even more important when mixing with less-than-great monitors and/or in a room that has not been acoustically treated, which might mislead you into creating an unbalanced mix; for instance, if your monitors/room make bass seem quiet and indistinct, you may boost the bass way too much to try and compensate, resulting in a mix that sounds boomy and amateurish when played elsewhere.
"Spectral analysis is particularly useful when checking the overall balance of frequencies within a mix or the relationship between individual elements of a mix."
It's always good practice to compare (or 'reference') your track against a suitable commercial release, and a spectrum analyser is an excellent way to make that comparison more objective.

Block/window size

The majority of spectrum analyser plugins use a Fast Fourier Transform (FFT) algorithm to break complex sounds down into many frequency bands - make these bands narrow enough, and we can effectively see the levels of individual frequencies within a sound. The resolution can typically be adjusted through a parameter known as 'block size' (sometimes called window or FFT size), which is a reflection of the number of samples analysed at a time.
Put simply, setting the block size to 64 means that a new measurement will be taken for every 64 samples of audio - this won't give a detailed frequency breakdown, but it will yield a rapidly updating frequency curve. Setting the block size to 65536, however, will provide very detailed frequency information, but a slow, jerky refresh rate. A frequency analyser will often provide an Overlap function, which can alleviate jerkiness.
"The majority of spectrum analyser plugins use a Fast Fourier Transform (FFT) algorithm to break complex sounds down into many frequency bands."
A crucial point to note is that FFT frequency resolution is linear; that is, if the block size is set such that frequency is divided into 100Hz-sized bands, this will divide the octave from 10-20kHz into 100 parts - easily enough to give us a graph where we can discern individual notes in that range. However, at the lower end of the scale, 0-100Hz will be represented by just one band - we won't be able to pick out individual frequencies below 100Hz, only the overall level.
You may therefore need to increase the resolution (block size) to get an accurate picture of your low end, but this could lead to an overload of information further up the scale, which ironically can make it harder to grasp what the graph is really saying.
Some analysers have a smoothing feature to help with this, usually grouping bands together according to octave or sub-divisions of an octave. A smoothing setting of one octave will break a full bandwidth resolution of 20Hz to 20kHz into ten bands, each an octave in width, giving you a digestible breakdown of your mix's energy. Some analysers will display these simplified readouts as bar graphs; others will display them as smoothed graphs with no distinct banding.
Spectum analyser
This analyser is running in a 1/3 octave mode, where each bar of the graph represents one third of an octave.
Experimentation will ultimately help you to decide which mode to use when, but usually you'll want high resolution when trying to identify problem frequencies or resonances, and a smoother, less-defined setting when trying to get the big picture during mastering.

Further options

The default mode for spectrum analysers is to show peak amplitudes of frequencies, but this can often be switched to a mode where the amplitudes are averaged over a certain period of time (eg, the last five seconds), giving a much more stable view of the general frequency curve of the signal.
Some analysers will also average 'infinitely' (well, until you click on the graph to reset it), and in this mode, the graph will gradually 'stabilise'. This is very useful when you need to view a track's general frequency curve during mixdown or mastering.
"One interesting point to note is that a mix that is EQed to sound flat will not necessarily look so on the graph."
Many analysers let you view the instantaneous 'real-time' and 'average' curves simultaneously on the same graph. You'll normally also have a variety of peak hold options that will keep peak amplitudes displayed for a user-defined time.
One interesting point to note is that a mix that is EQed to sound flat will not necessarily look so on the graph. This is because our hearing does not respond to all frequencies equally; for instance, 80dB at 100Hz sounds quieter to us than 80dB at 1kHz. In fact, many analysers artificially adjust the slope of the display so that what looks flat on the graph does sound relatively flat to us, and the common setting here is between 3 and 4.5dB/octave, approximating our ears' response. A well-balanced mix viewed using a 3dB/octave slope setting would have a mostly flat appearance, sloping neither up nor down by very much.

Processing Vocals

Some tips for processing Vocals.


1. Use a corrective EQ to roll off low end from the mix.  Also, check for resonance around the 200Hz mark.

2. Add a compressor.  The attack and release play an important part.  Normally a fast attack will push your vocal back into the mix, if you want to have the vocal to be more upfront then increase the attack time. Same logic applies to the release, wherein a slow release will push your vocal back into a mix and a quick/medium release will make it up front and bigger.


3.  Add an EQ after the vocal. Add a little 2-3 db boost at 10 k and 2 -3 b boost at 4.2k for presence. Watch out for sibilance between 4 - 5k


4. The CL2A works really well on vocals.


5. For sibilance, use Sonnox or manually go through the audio file and reduce the volume on the S's manually. A good way to test the Strength is to push it so that the singer sounds like they have lost their teeth.  Then ease back until the vocal sounds nice again.


6.  Plate reverb works nice on vocal.Slow tracks long reverb.

The key is to have the predelay set right